Installation of Certified Software Modules
With the introduction of new generation BSPs, system component updates or application installations can only occur if they are certified via a digital signature performed by the manufacturer. Limiting the installation of software modules to signed modules only is a fundamental security practice that offers numerous advantages. In essence, it ensures that the software installed on your system is authentic, integral, and unmodified by unauthorized third parties.
The new generation of BSPs 4.1 and 5.1, starting from build 665, include the ability to control that every module installed on the panel must be signed. To reduce the impact of this new functionality, the new BSPs are distributed with signature control disabled. Anyway, we recommend carefully reading this guide and enabling support for signature control (see: "Allow installation of unsigned modules (Compatible Mode)").
Since European directive RED-DA-18031 requires verification of software module authenticity for all devices equipped with radio equipment, when WiFi is enabled (for devices that support it), it's recommended to also enable signature control.
When signature control is enabled, the user must obtain their own certificate (User's Certificate) to sign and install applications on the HMI device.
Signed file
To install or update a software module, you'll also need to provide the module's signature file.
The file containing the module's signature is a two-line ASCII file. The first line contains the MD5 hash of the file, while the second line holds the module's signature performed by the manufacturer.

User's Certificate
If you don't own a certificate to sign your applications for upload to the device, you can create one using OpenSSL.
Here is an example of how to generate a certificate using a public OpenSSL-Win32 library (https://www.openssl.org).
File: CreateCertificates.cmd
@echo off set OpenSSL="C:\Program Files\OpenSSL-Win64\bin\openssl.exe" set CertificateName=MyCertificate rem Generate an RSA key %OpenSSL% genrsa -out private_key.pem 4096 rem Creating Certificate Signing Requests %OpenSSL% req -new -sha256 -key private_key.pem -out certificate.csr -subj "/ST=NY/C=US/L=New York/O=CompanyName/OU=R&D Team/CN=%CertificateName%" rem Self Sign the Certificate Signing Requests %OpenSSL% x509 -req -days 365 -in certificate.csr -signkey private_key.pem -out certificate.crt rem Convert to .pfx file %OpenSSL% pkcs12 -export -passout pass:PswOfCertificate -out certificate.pfx -inkey private_key.pem -in certificate.crt -CSP "Microsoft Enhanced RSA and AES Cryptographic Provider" pause
The procedure will require creating a password, which will then be necessary to access the certificate's private key (in the example script, the password "PswOfCertificate" has been defined).
Two files will be generated:
- certificate.pfx is the certificate containing the private key to install on your PC to sign code. You'll need the certificate's password to install it
- certificate.crt is the certificate containing the public key that must be installed on the HMI device so it can verify the signature
- private_key.pem It's the file with the private key associated with the certificate that can be used to sign your applications. It's crucial not to disclose this key to avoid invalidating the encryption process.
In JMobile, the cryptographic service providers shown in the image below are supported.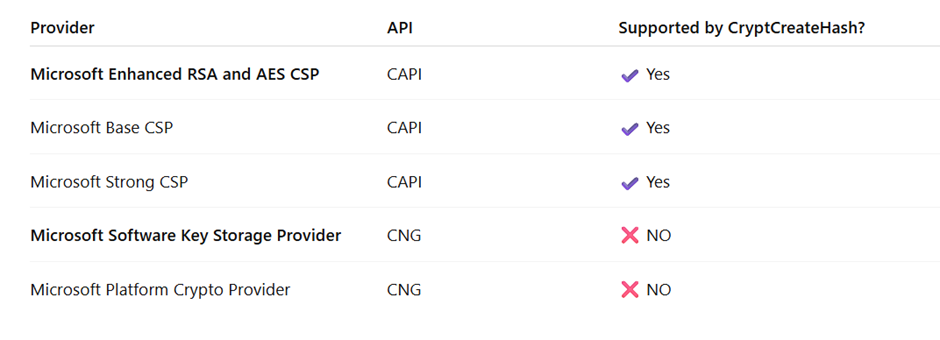
How to install the certificate on the HMI device
On the HMI device the certificate.crt can be installed from the System Settings of the HMI device in the Security area (Ref. "Security").
In the Security area, select:
- Domain = Public
- Secret ID = App Certificate
- Type = Certificate
- Use the "Update" button to load the certificate

Script to sign a file
Here is an example of how to sign the application file to be installed on the HMI device.
File: Signing.cmd
@echo off set OpenSSL="C:\Program Files\OpenSSL-Win64\bin\openssl.exe" set FileName=MyApplication.zip rem Generate the MD5 file certUtil -hashfile %FileName% MD5 | find /v "hash" > md5.tmp rem Sign the MD5 file %OpenSSL% dgst -sha256 -sign private_key.pem -out %FileName%.sig.tmp %FileName% CertUtil -encodehex %FileName%.sig.tmp encoded.tmp 12 > nul rem Merge MD5 and sign copy /b md5.tmp+encoded.tmp %FileName%.sig > nul rem Delete the MD5 file del *.tmp echo Done pause
A new file with a .sig extension will be generated:
- MyApplication.zip.sig It's the file with the application's signature to be used for installing the application.
Signature of USB tools
Applications run from a USB drive will also need to be signed. In addition to the tool itself, a file named "manifest.json" must be included on the USB drive, containing the signature for each file belonging to the tool. The "manifest.json" file itself must also be signed.
Here is an example of a manifest file.
File: manifest.json
2b3247e12c7d99d20cd797c2239e50f345f0f6676ea6872b1943be4144ec... { "name": "PrintScreen", "version": "1.0", "files": [ { "path": "autoexec.sh", "signature": "badf27ae987e4c70a45ae20ee2d4545e7e8bd... }, { "path": "bin/mylib.so", "signature": "d725d491fe911afe39ce4c5380aff2f1a115c... } ] }
The first line contains the signature of the manifest.json file, while the file itself lists the tool's files with their signatures.
Here's how to prepare a manifest.json file, step by step
- Create a text file without the first line, meaning the text contained between the two curly braces (here you need to include one or more files).
- Using the "Signing.cmd" script, generate the signatures for each file.
- Copy each file's signature (the second line of the file generated by the "Signing.cmd" script) into the "signature" field of its respective file descriptor.
- Use the "Signing.cmd" script to generate the signature for the "manifest.json" file.
- Insert the "manifest.json" file's signature (the second line of the generated signature) into the first line of the file.
Manufacturer's certificate
To validate the integrity of the certificate included in the BSP, it is necessary to verify the fingerprint contained in the certificate and displayed in the first line of the management page ("Update System Components") by comparing it with the fingerprint published by Exor International S.p.A..
| Date | Fingerprint | Status |
|---|---|---|
| 18/Jun/2025 | 11:DF:FE:FD:E5:55:A9:D0:2A:3B:EE:70:BA:29:C9:73:B9:F0:72:41 | Valid |
Guideline
When signature control is enabled, all software modules, including applications, can only be installed if they are certified (i.e., signed by the developer). Therefore, the application developer must obtain their own certificate to sign the applications or modules they intend to distribute or install on the device.
The certificate essentially consists of two keys: a secret key (which must not be disclosed) that allows the developer to sign the application, certifying it was developed by its owner, and a public key to be installed on devices, which allows for verification of the signature's authenticity. After installing the public key on the devices, the developer can generate their application and distribute it along with the file containing its signature to install it on the HMI devices.
System modules as well, e.g., Data Partition, Settings, FRAM, etc., must be signed to be loaded onto the device.
The user certificate, if installed, allows for the signing of all device modules except for system modules (MainOS, ConfigOS, and Bootloader), which must be signed by the manufacturer.
Step by Step Procedure
- Use the CreateCertificates.cmd file to generate a certificate.
- Use the Signing.cmd file to sign the software module you want to install on the panel.
- Install the certificate.crt, which contains the public key, in the "Security" area of the device where you intend to upload your application.
- Provide the software module and its signature during the installation process.
How to install JMobile
When signature control is enabled, the JMobile runtime must also be signed. To do this, you'll need to create and install your own certificate to sign the runtime (UpdatePackage.zip) for installation on the device.
Newer versions of JMobile, starting with v4.07, also create the UpdatePackage.zip.sig file with the signature and send it to the HMI devices when downloading the runtime. If an older version of JMobile is used that doesn't support signature management, the UpdatePackage.zip.sig file will need to be created manually using the proposed Signing.cmd script. In this case, runtime installation will only be possible through the BSP's System Settings interface (Ref.: "Applications").
When using old JMobile versions with new BSP versions:
- You cannot install the runtime directly with JMobile. You can do so through the BSP's System Settings after creating the UpdatePackage.zip file (using JMobile) and an UpdatePackage.zip.sig file (using the script file).
- The UpdatePackage.zip.sig file, which contains the digital signature, is not required when the update is performed by the runtime via the contextual menu.
- Manage Target cannot be used to update the HMI devices.
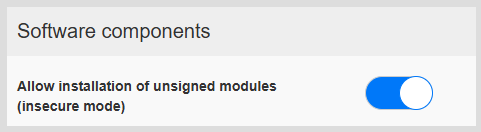
Allow installation of unsigned modules (Compatible Mode)
Signature verification can be disabled, however, this is an unrecommended operating mode that you shouldn't use unless you're fully aware of what you're doing.
System Settings -> Security -> Software Components